Thursday, March 20, 2008

Easter Eggs

Just in time, have a good Easter (if you celebrate it).

Also, I would like to talk about a topic that matches this time of year very good.
Easter Eggs in DVDs.

Easter Eggs are some "hidden" things in the DVD discs. Some funny outtakes, additional scenes, interviews, or other things.

In cases where these features are video you can also encode them for use in your Nseries.

Some things you may need:

  • Have a DVD that has these hidden contents (there are some websites that keep track of these easter eggs or hidden features)
  • Identify the Track number and Chapter number where these video clips are hidden
  • Have a DVD software that allows you to read the Track and Chapter numbers like Imtoo DVD to 3GP.
  • Encode using working settings
Using this method I extracted the clips from the Extended editions of the LOTR trilogy, Outtakes from the Star Wars DVDs, etc.

If this information is not enough to allow you to do this. Leave a comment and I'll update the post with more details.

Until next time,

May the force be with you!

Monday, March 17, 2008

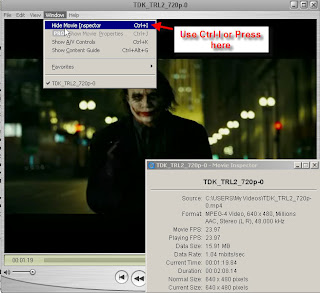
How to check your video properties?

Many of us have problems converting videos. It's not straightforward. And when you ask for my help I always ask about your video. You should always be able to read what type of video you are dealing with before you start questioning why it doesn't work.

In many cases once you read your video properties it will become quite obvious why it doesn't play. As long as you know that compatible resolutions are:

sub-QCIF
QCIF
CIF
QVGA
VGA

So take these tips as an important step into figuring out what you need to convert in order to be able to use the video in your phone.

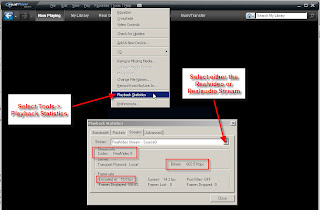
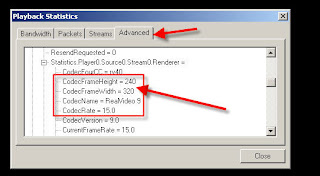
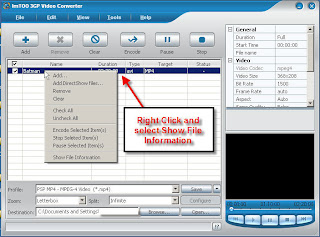
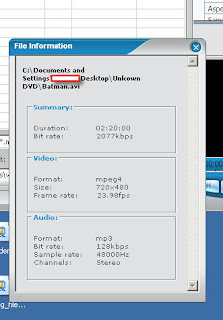
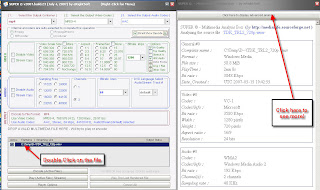
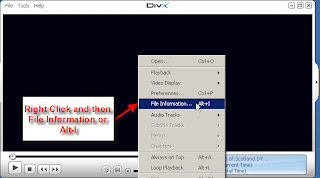
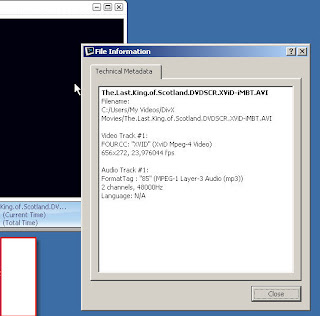
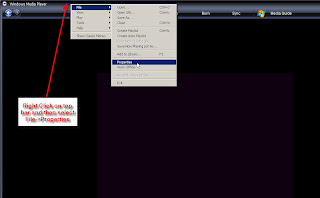
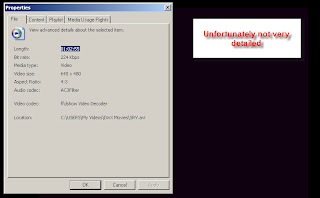
These are some useful ways to see the video file information in different players or applications.

Quicktime


RealPlayer


ImToo 3GP encoder


SUPER

DIVX player


Windows Media Player 11


Let me know if this post was useful. Since I use these tools all the time...

Until next time. Keep on watching...

Thursday, March 13, 2008

Widescreen or Fullscreen and why?

Hello again.

This time I want to touch on the question of the aspect ratio of your videos and put forth some pros and cons.

These comments, as many others I've made and will continue to make here, are my opinion. And opinions are like belly buttons, everyone has one! (ok someone may not have either).

So why do we have this widescreen and why is it so difficult to make a screen fit another screen.

Well let's start from the beginning...

Umm, where to start. Ok let's start with the good old television. Television systems (since the B&W) days have been an aspect ratio of 4:3. Then we had 3 different color systems, PAL, SECAM and NTSC. Each system with a different number of lines (resolution) and frame rate. In particular there's the difference between PAL and NTSC where one is interlaced and the other has full frames.

Anyways, I don't want to get into more details than what we need. Suffice to say that the programming created for each system (tv. shows, made for tv movies, etc.) can be of different resolutions, framerates, and be interlaced or not depending on what they were shown originally.

Then we had the tape era, and again the basic differences were following the TV standards. In the DVD era things started changing. As the underlying video source could be shown in multiple tv standards by Software manipulation. This is both good and bad.

Some years ago HDTV started gaining some traction. And then we started getting some TV content made in "widescreen" format to fit these new TV sets. For the most part these new programs are displayed in a 16:9 aspect ratio but the resolution and framerate depends on the HDTV standard used. Then we also have progressive and interlaced but this is mostly handled by the TV decoder.

But let's leave the TV originated content and switch to the movies. Movies in the really old days were shot in a square aspect ratio. Then they started moving to some other aspect ratios until the cinemascope aspect ratio came about. As things progessed we started having some other aspect ratios for Panavision and also for IMAX theaters. Along with the aspect ratios different technologies in the film have changed, including how many frames are shown, the size of the film frame and recently the digital projection method that does away with film altogether.

What this means for the Widescreen discussion is that there are different sources of Aspect Ratios depending on when the movie was shot, and what type of projection method it uses.

Now I'm going to ignore all the different things you can find on the internet, since these aspect ratios you find have nothing to do with the original content from the TV, DVD, VHS, Laserdisc, UMD, DAT, BRD, HD-DVD, etc.

If you are a film buff, then you may agree that the widescreen original format is the way to go. But what about the aspect ratio?, well even if you use all the pixels the aspect ratio may be wrong due to non-square pixel usage.

So what can you do?, I don't have a good answer.

If you don't want to see the full picture and want to see a cropped version of the original content then this is what you can do.

I'll use the NTSC DVD from a recent movie as example. PAL DVDs are usually 720x576 5:4.
See more here

If you open a DVD stream it's size is usually 720x480 (720x576 PAL) which is an aspect ratio of 1.5 (1.25 PAL) but the actual video is aspect ratio of 2.35 so what they do is they put the black bars already in the DVD video to fill the extra pixels to make 480.

So when you try to convert it using some Pan&Scan or Zoom it calculates these black bars as being part of the picture frame, so it converts from 1.5 (1.25 PAL) to 1.3333 aspect ratio (320x240), but in reality it should convert from 2.35 to 1.3333. That is to say the converter thinks the movie is 720x480 and converts it to 320x240 but the actual video part is only 720x306, but since 306 is not divisible by 16 then they pad the video with black pixels.

This is further complicated because some movies use also other aspect ratios like 1.778 (16x9) or 1.85 (cinemascope) but then they put those also into 720x480 NTSC DVD (720x576 PAL).

So what can you do. First is figure out what the actual video screen aspect is. Most DVDs will have this information in the back of the box.

Then get a calculator and figure out how many pixels are there in the vertical and how many pixels are there in the video feed. So if its a 2.35 anamorphic movie and the video size is 720x480 the actual video size is only 720x306 so there are 87 extra black pixels in the top and bottom. (There's more in the PAL DVD)

So in order to get full screen you would have to first copy the movie into WMV or AVI (but you must have DIVX codec installed in your machine to use AVI or FFMPEG). And don't change the resolution leave it in auto.

Now you will have a DIRECTSHOW file that has the black bars. Now you will use SUPER encoder (www.erightsoft.com) to re-encode this video. Encode into WMV or AVI if you want to further encode it or directly into MPEG-4 if you want. Use the DIRECT SHOW BUTTON and then you will have to use the CROP/PAD and you will crop the picture.

156 pixels on each side and 86 on the top and 88 on the bottom. This will create a video that's 408x306 (or 1.333333). Now use Super again and encode into the right size. (320x240).

Complicated, no?

Well in the end I think this is a waste of time. I just use the medium zoom option in ImToo DVD to 3GP Converter and this is a good compromise. I don't loose a big part of the frame and I can see it better in the small screen.

Wednesday, March 12, 2008

Will this video play on my Nxx?

Sometimes the question is: why doesn't this video play?

Well to learn more see my old post HERE

_________________

I know some of you will not so here are some more generic tips.

These are the generic baselines for most Nseries devices. Some models support more, but as a general guide.
Basic compatibility
  • RealVideo 8,9 and 10 (note that there is no support for Realvideo 7! or 11). Video size of QCIF, QVGA , CIF. Bitrate of 128 Kbps.
  • h263 video in 3GP or 3G2 or MP4 container at 128 kbps (narrow band audio AMR or AAC)
  • MPEG-4 in a 3GP, 3G2, MP4 or M4V container at 256 kbps (aac audio mono or stereo)
And that's it!. Then you start getting into the category that some will play and some will not.
Newer Nseries:
  • Support VGA MPEG-4
  • (N95, N81, N82, etc) support H264 in an MP4 or M4V container. BUT, and this is key, only the Baseline profile of H264 is supported.
iPod, iPhone and PSP also support H264 but they support different versions of the codec. Including Main Profile, Sorenson H264, Spark or other levels of the BaseLine profile not supported by Nseries phones.

This is why many of the H264 videos don't play on Nseries devices even if they are in a supported resolution and bitrate.

As of today N95, N95 8GB, N93 and others support H264 at QVGA resolution. At VGA it will stutter or not play regardless of the bitrate or frame rate.

A note on quality, different codecs and framerate.

In general, the quality of a video is dictated by the resolution, bitrate and the frame rate. But these parameters also control the size of the video.

Plus if you use MPEG-4 and AVC (H264) the resolution has to be divisible by 16, otherwise you waste a lot of space (resulting file is needlessly large). So if you use a resolution of 640x480 this is better than 640x396 since 396 is not a factor of 16. 320x160 is better than say 320x150. 320x144 is OK though.

OK, this is basic good information but I want better quality than the general compatible quality!

In this case it starts to get more complicated as videos you encode may ONLY work on your device and may not work on other devices. For the best settings IMHO see my post about using SUPER.

What if I want to play AVI files or XVID?

This is also a common question. First thing is you need to get a player for your device that can play this codec.
I recommend you get DIVX mobile Player (see links at the bottom of my blog)

If you want a better experience and don't mind spending some money get CorePlayer or Smartmovie.

Anyway. What ever the player you get there will be some limitations due to the smaller CPU in the phone than your PC. So as a rule of thumb in my experience videos that are smaller than VGA tend to play almost correctly. Videos that are VGA or greater will drop many frames. Again QVGA, CIF videos play correctly almost 100% of the time. Also VCD resolution plays ok (480x480) for the most part. But once you get higher than this you start running into problems.

TIP: Using TV out is great because TV-out resolution is VGA instead of the internal display 's QVGA. So you see more pixels with TV-out.

TIP: When you use TV-out the CPU has more to do, so a video that plays marginally good in the phone may not play or play worse when using TV-out.

I welcome your comments. Tell your buddies about the blog, email the posts. Let's get more people into enjoying Video in their Nseries devices!


How to COPY files between PC and Phone (Just for you bettina...)

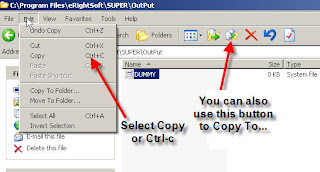
Ok here are some pictures on how you can Copy a file in the PC from one folder to another.

First open the Windows Explorer to the folder you want the files. In this case the Output folder from SUPER. See picture:
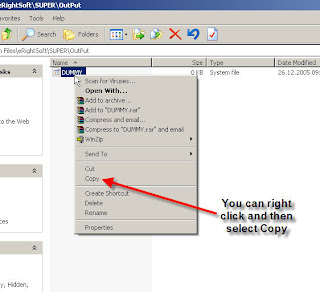
Alternatively you can select the file then right-click on it like this:
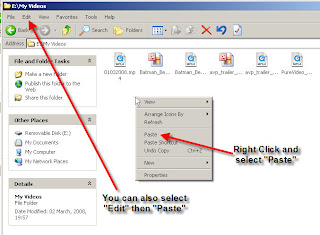
Now the file is the windows "clipboard" a temporary storage location. Now open the folder in you phone, in this example is E:\My Videos but it could also be I:\My Videos.
Select Paste.

You can do this with many files at a time, folders, or one by one.

Other tips. If you want to select multiple files, select one file (click on it) then hold down the "Shift" key on your keyboard and select another file. All the files in between will be selected.

Another method is to click on one file then hold down the CTRL (Ctrl) key and select another, now both files will be selected. You can use this method to control which files you select. If you want to remove a file from the selection just click on it again (while still holding down the Ctrl key).

I hope this helps!.

Tuesday, March 11, 2008

How to become a better Video editor...

Ok the title is a little deceptive.

I assume most people don't want to learn, couldn't care less .... about the technical details and nuances that come with digital video editing, video encoding and video conversion or transcoding. And I agree 1000% :)

But to be honest the only way to make sense out of all these things is to study a bit and learn about what you're up against. At the minimum you should have this links somewhere so that if you see an acronym or term you don't understand you can go and read about it. READ, such an underrated tool...

So without further ado, here are some good links for information:

So what do Nokia S60 devices support?; well see this:
Nokia Video Feature table (press "Audio & Video Features tables")
Unfortunately not all the information on that Table is accurate. E.G. In there it shows the N91 supporting 320x240 h264 AVC which is incorrect, it only supports QCIF h264.

If you don't know what QCIF means go HERE.

A good guide about "anamorphic video" and why should you care. No, honestly this is a must if you are encoding videos from a DVD and want to get rid of those pesky black bars. AnamorphicGuide
If you still feel like you need to get to the bottom of the resolution issues. READ this it's a really good page.

Video Containers (these are those extensions we see but are different that codecs)

Different Video Codecs (Must read this)

DVD video Highly recommended to read.

MPEG-4

MPEG-4 Video stuff

MPEG-4 Part 2 Divx, Xvid and Quicktime

MPEG-4 levels

Video Codec (what's a video codec really?)

Mpeg industry forum

This is not an extensive list and by no means do I encourage people to become experts. But if you are of a technical inquisitive nature, then go and learn about it, and then come back and teach me a thing or two ;)

Cheers!

Thursday, March 6, 2008

Using SUPER encoder with Nseries

Hello fellow Nokia users.

I want to spend some time with this post, I began working on it some time ago. The main idea is to provide a "fail safe" mode and setting to encode both VGA and QVGA resolution movies that will play in your Nseries device.

Before you begin check out my list of installed software. My setup

If you just want to know some settings that work for most Nseries devices then click on the pictures below. Just make SUPER settings look like this:
h264 settings
mpeg4 settings
If you want the more detailed walkthrough keep reading.

One thing that's important before you begin is to get codecs into your computer. The most important one that I recommend is DIVX codec since this one will allow you to use AVI files (xvid or divx) as DIRECT SHOW files. HERE

Direct Show is important as this enables the coder software to manipulate the stream (I don't think we need the technical details). Basically allows you to do advanced editing functions like rotating, cropping, flipping, mirror, etc.

You also need a player. Quicktime is quick and easy (pun intended). So go get it HERE
I know you could use the Nokia provided Multimedia player but I find Quicktime much more convenient and better.

Another good addition would be FFDSHOW mpeg4 codec pack but this is not necessary strictly speaking and it's a bit more complicated so I'll leave this one alone unless you feel comfortable messing around with advanced settings.

Ok once you have installed the codecs, now it's time to get the SUPER encoder. This is where some people have their first problem, they can't find the download link or it doesn't work. This is the direct link:

Click on the picture

If you have problems the help provided is pretty self explanatory. Use IE, turn on Java scripts, clear the cache and don't connect through a proxy. When ready hit the link "Start Downloading Super".

You should be able to save the file SUPERSetup.exe. Run the file and install SUPER. I believe it connects to the internet while installing, I've done my own checking and nothing malicious, but if you feel unsure about it, just don't install it.

With me so far?, ok, now an icon will be created in your desktop. Now you can start using SUPER. When you start the program it will connect to the internet and check that you have the latest version.

Once it starts you are at the main screen which can be rather intimidating at first. But once you know what the things are then it's actually not that hard. Once you set it once you pretty much don't need to touch it again as it will save the last settings you used to encode.


Ok now let me go over the main controls that are at the top numbered 1,2 and 3.

The first one is the Container. This refers to the extension or MIME type that the file will be output to. Like .MP4, .3G2, .3GP, .AVI.

For Nseries devices you can select mp4 or 3gp. Other settings MAY work but I haven't experimented with all of them. So feel free to try on your own time and share your results.

Now let's move to the next setting. The Codec.

The codec list shown will depend on the Container you selected in the previous screen. So for MP4 that would be the list of codecs. For Nseries devices you can use MPEG-4, H264 or H263.
Well now, it's time to select the audio codec. In this case it's simple. Just leave the AAC as the codec.

The next thing I want to touch on is DIRECT SHOW button.


When you will use an input file (the video you want to transcode), that's supported by Windows, then it's a Directshow file. Basically if Windows Media Player can play the video then you can select Directshow. There are some limitations though and it may not work 100% but that's the theory.

Why is this importat?, well as I mentioned before if you have Directshow then you can do more advance editing on the file like these options (press the Button):


So, you can join files to create looped version (multiple copies end-end) slow down playback, speed it up. flip, rotate, change colors, change to B&W, include fade in or fade out, add the clip info or a watermark.

Just remember that you should do just 1 effect per transcode. This is important, if you select multiple things then it will fail. Also Remember to press the RST (reset) buttons to CLEAR your settings after you are done, otherwise the next video you transcode will use this same settings.

If the video you are converting is NOT Directshow. Like a Quicktime movie or an FLV, then don't select DirectShow!

So now we have selected the Container, Codec, Audio and DirectShow settings (if applicable). It's time to select the video output details. Click on picture for bigger picture.

It's pretty self explanatory. I just want to point your attention to the H264 button. In some posts I've warned people about the different H264 types and why some H264 files don't play. Well hit the button.
And a new window will open (you can move the window location). Then here it's very important to select BaseLine. Otherwise the video will not play.
Now let's continue with the settings. The next area you see is the AUDIO section of SUPER:

As you can see you can select here the sample rate, number of channels, bitrate and Language track (for DVD video files but I've never used this feature). I recommend not going overboard with the Sampling frequency and bitrate. From my experience 64 or 96 kbps produce decent quality audio for most applications and sampling at 48 or 44.1 Khz is ok.

Now that we've looked at the main settings. Let's encode a file.
The first thing you need to do is right click on the SUPER window to bring up the menu.
Then from here you might want to change the output destination folder so that you manage where the encoded files end up (by default they end up in c:\program files\erightsoft\super\output).
Now select Add Multimedia Files and select the files you want to convert.
Once you select a file it should look something like this:
The files will be listed there with a checkbox next to it. The file has to be checked to be converted. Please check that it's checked.
From here you can also play the file using the Play button, or Encode.


Then sit and wait.
Encoding times vary greatly depending on the settings, the input file type, your CPU and memory and what you're doing. But on average expect the transcoding to take 1.5-2 times what the file is. So for a 2 hour movie expect 3-4 hours. conversion time.

Ok, congratulations!, you've successfully transcoded a video. Now it's time to put it into your phone.

Easiest way:
  1. Connect the USB cable to phone
  2. Select File Transfer or Data Tranfer or Mass Storage as USB mode
  3. Once Windows completes adding the device open the File Explorer in your PC and locate the new Drive that represents your phone
  4. Copy the video file to this drive under My Videos.
  5. If you don't know how to copy a file in Windows then maybe video conversion is too advanced for you.
If you want to add a thumbnail to your video. Get a picture that represents your video. Or capture a frame from you video (SnagIt or similar program can be used) and then follow my instrauctions as here.

TIP: Remember to always stop your USB devices before unplugging them from your PC to avoid data corruption. Press this button:

This is not a be all, end all guide to using SUPER but I hope that with this information you are able to use it for video convertion into Nseries devices. For more detailed instructions and features go to the Erightsoft pages HERE

I welcome your comments.

Until next time,

Cheers!

Monday, March 3, 2008

Nice Video Preview of N96 from AAS

All About Symbian has posted a cool video preview of the Nokia N96, if you haven't seen it I've posted a link here for your enjoyment.

Cheers!

Multimedia from All About Symbian

Add thumbnail to Video Center

How to add thumbnails to Video Center.


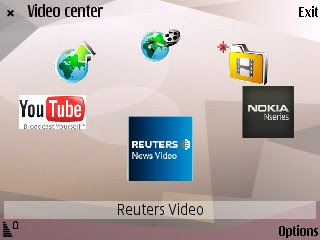
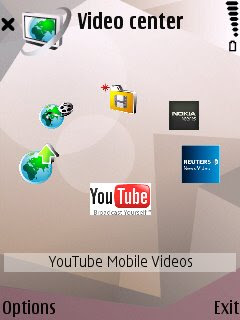
Since the N95 we were introduced to video Center, a Nokia application that allows you to access Video feeds, do syndication (video podcasts) and also download and manage videos. If you've never seen it, it looks like this:


Some things to remember is that you need to set-up how Video Center access the internet for most of the things to work.

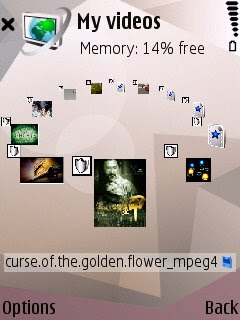
But I'll talk about Video Center in some future post, for now I want to show you how you can put your own thumbnails for the videos shown in the Video Center (My Videos) folder.

It's quite simple.
  1. Get your video
  2. Get a picture file for your video. JPEG, PNG or GIF (but no animated gif)
  3. Make the picture into a thumbnail of 320x240 or 240x320 in size. Size is important, you can go even lower rez. the actual picture that's displayed in the screen is only about 70 pixels tall. The only thing important is to make it in an aspect ratio of 4:3 (1.33333). Other aspect ratios WILL work but the icon will show smaller*.
  4. Rename the picture EXACTLY like your video file. Pay attention to the letter case as it has to match. (Video.mp4 and video.jpg will not work, it has to be Video.jpg)
  5. Now that you have the picture and the video file, copy it to the My Videos folder on your Nokia Nseries.


On newer software (N95 v20, N82 v11), Video Center will try to create a thumbnail on its own, but if you loaded your pictures as described above it will use the picture instead of the thumbnail it creates. In fact if you are experiencing problems of video center closing by itself it may be because it cannot create a thumbnail. If this is happening load a picture to each video file you have as described above and the problem will be fixed.

* If you don't know how to edit a picture file then leave a comment. Windows comes already with a couple of simple tools to edit pictures and there are 1000s in the web.

FREE TRIAL