
If you've found this blog it probably means that you are looking for some information on how to encode or convert videos to play on Nokia phones.
So what are the basic posts you should check out?, where to start?, here are some tips.
If you want information on what settings to use for N96 then go HERE
If you want to know how to use SUPER check this post
If you want to find out the detailed information of your video clip either for your records or to ask for my help check this post. Make sure you also check the other POST
If what you want is to know what are the basic video capabilities of Nseries products check HERE
And if you want an in-depth description of how to change a widescreen to full screen then READ THIS.
TIP: You can also check all the posts by either subscribing to the RSS feed.
TIP: You can check out the Blog Archive in the right-hand side below the YouTube logo.
Enjoy!
Wednesday, December 3, 2008
Tuesday, December 2, 2008
Music player Database problems
UPDATE 3/29/2010:
Some people may be using the Ovi Player. Ovi Player seems to do some additional changes to how music is index in the device, as some people are having problems following this method when they use OVI player. So if you use OVI player this MAY not work for you.
Keep this in mind before trying this method.
I've not used OVI player to find out how to fix the similar issue when this software is used.
Thursday, October 2, 2008
Some tips and other info for N96
I also got a link to a good first hands-on review here from user grschinon from the NSD.
I don't really plan to do an review or first hands since there are already quite many out there. Plus, I don't think I can add anything really to warrant yet another review.
But I do have something to share...
Here are some tips for N96 if you are getting one or just got one.
NEW (Oct 17, 08):
Music scanning Forever:
- Don't change the default date separator from "/" to ":".
- If you change the default date separator then you get the Music scanning and never ending.
First Boot:
- Enter the correct date and time. This is important as some copy protected items such as game installations may fail if you enter a wrong date (future or past)
- After the Idle Screen (“Active Idle”) is displayed, some software is still being loaded and some first-time initialization is still proceeding. It is best to leave the phone by itself for about 1 minute. If you start fiddling with it right away, you may experience the device to slow down severely or even hang; it is best to let it finish the first-time software processes.
- The end of bootup seems to be when the battery and signal is visible.
N-gage first-time use:
- N-gage games that come with the device are just pre-loaded but still have to install themselves. The installations takes a few minutes, so the first time you open N-gage application you will need to wait for all installations to finish.
Blinking Envelope (Message): This means you have unread or old Messages stored in the SIM card. Open the Messaging application, Open SIM Messages -> Delete Old messages.
Naviwheel: There’s no Naviwheel functionality in N96.
Keep your original Battery Cover: The original battery cover contains antennae for WLAN, GPS, Bluetooth and DVB-H. If you purchase unauthorized third-party battery covers, you might find that they will not work as they are missing these antenna components!. Or the performance may be greatly reduced.
Scanning for new content (slowness in UI)
- This is somewhat improved in 11.018 but still:
- If you've loaded many Pictures, Videos or Music, you may see the device appear to slow down or even become unresponsive. After new content has been added, it is being scanned by the device and being added to the media applications. Until that happens, the new content may not be visible in these applications (e.g. Photos and Video Center application) right away. The phone will need to find the files and create the thumbnails and other details. This information creation takes time and the processing may slow down the device. Your best option is to open Video Center and Photos and leave open in the background then check after a few minutes if the videos and pictures you loaded are already there before using your device.
The same applies if you insert a memory card with lots of content on it.
- Do Not leave the Photos or video center in background during this time.
Remember to Safely remove the MEMORY CARD:
- You risk corrupting your memory card and losing files if you do not remove the memory card properly. Never just take it out from the card slot. The right steps are: 1) press the power key for a short moment until the power key menu appears. Scroll to the item “Remove Memory Card”. Select this menu item. A dialog appears: “Remove memory card and press OK”. Remove the memory card from the card slot, then press the softkey for OK. There may be a dialog that indicates that some applications have to be stopped, if there were applications currently accessing the memory card.
Power Saving tips: Again...
Here are some tips that may help you save battery power. In general, you should turn off functions when you do not need them.
- Turn Bluetooth off when not in use
- Turn off WLAN scanning (from Standby Screen)
- Reduce the brightness of the screen (Settings -> Personalization -> Display
- Turn off Navi "Breathing" for the light ring on the scroll key
- If your network operator does not offer 3G, turn off 3G usage
- Close down unused applications that run in the background, like Music, Browser, Maps, Fring, etc.
- Avoid using carry cases with magnets as this may cause the device to wake up
- If you are fairly low in battery level and want to extend the usage time with the remaining battery power, use the power savings mode (Power key--> Single press --> Power savings mode). It will reduce display brightness to the minimum level, and change the backlight time out to 5 seconds.
- Ensure that Maps application the Camera application (if location tagging is on) are not active when not needed
- Do not leave the USB cable connected as this causes power to be consumed even if no data is being transferred. Use the CA-126 USB cable for USB connections (it charges at the same time)
- DO NOT set Bluetooth visibility to "Define Period" this seems to drain the battery faster
- For GPS Navigation, set the backlight setting to "Optimized" rather than "Always on". Go to Maps-> Options -> Tools -> Settings -> Navigation -> Backlight set to "Optimized".
- Use "Headphones" rather than "Lineout" when playing music
Thursday, September 25, 2008
Good document with details about video for Nokia devices
HERE you find it.
It's a PDF file from Forum Nokia with more details about how to create video content for Nokia devices.
ENJOY!
It's a PDF file from Forum Nokia with more details about how to create video content for Nokia devices.
ENJOY!
Tuesday, September 9, 2008
My recommended settings for N96 video
Hello again.
On this occasion I want to share with all my list of recommended settings for encoding video to be used in N96.
While I've done a lot of testing, please note that this is just my recommendation, and this was tested with a firmware that may be different to what you have in your hands so things may have changed.
I'll keep using the N96 and if I find any significant changes I'll post an updated version. I've also done efforts to cross check my findings with what's available from official sources so I feel pretty confident that these settings are accurate.
As always, if you have comments or questions, feel free to add them here. I'll do my best to review, post and answer any questions you may have. Even if the answer is "I don't know" ;)
Ok on to the settings:
Codec: MPEG-4 Part 10 AVC/H264 Baseline Profile
Container: .mp4
Resolution: QVGA 320x240
Aspect Ratio: 4:3 (1.3333)
Framerate: As per source but limit is 29.97
Bitrate: 600 kbps (but can go as high as 1 Mbps but there's little gain in quality)
Audio: mpeg4aac, 96 kbps @ 44.1 KHz sample rate (can use 48 KHz if source is 48 KHz)
Codec: MPEG-4 Part 10 AVC/H264 Baseline Profile
Container: .mp4
Resolution: VGA 640x480
Aspect Ratio: 4:3 (1.3333)
Bitrate: 1 Mbps
Framerate: As per source up to 29.97.
Audio: mpeg4aac, 96 kbps @ 44.1 KHz sample rate (can use 48 KHz if source is 48 KHz)
Alternatively you can use MPEG-4 Part 2 SP/H263 Simple profile as the codec and use bitrates of 3 Mbps, this creates much bigger files but it's an alternative to H264/AVC.
Keep in mind that TV-out will change your video somewhat as the video will need to streched/cropped to PAL or NTSC and also the frame rate will change to comply with TV standards.
Resolution: CIF (352x288) or QVGA (320x240). I haven't tested but QCIF (176x144) may also work.
Codec: WMV9 VC-1 SP/ MP.
Bitrate/Framerate: Depends on the profile you use. VC1 Simple profile: low level (QCIF 15fps), medium level (QVGA 24fps / CIF 15fps 384 kbps, VC1 Main profile, low level (CIF 30fps 2Mbps)
Audio part will be WMA (WMA2 part of WMV9) Use 32 kbps. and sample rate as per source material, you can of course go higher depending on the video bitrate. But for most cases I rather sacrifice audio quality than video since there's not a lot of headroom.
If you are already converting your videos to FLV you can also use them on the N96 but these videos don't show up in the Video Manager or Photos applications so you need to access them through the File Manager.
Here are the specs:
Codec: Sorenson Spark or h263 or VP6
Resolution: QVGA 320x240
Bitrate: 192 kbps (for video part)
Framerate: 25 fps for h263 15 fps for Sorenson or VP6
Audio: MP3 (Mpeg1 Layer 3) variable bitrate
Combined bitrate should be around 350 kbps (in my tests if you start going to around 500kbps then the playback becomes choppy).
Other Codecs and Containers
There are other possible codecs to use, like Realvideo (Rm or Rmvb) but after doing some testing I don't recommend using Real as the performance is much restricted. I guess the main reason for still keeping real (keeping it real), ;) is mainly for video streaming. So CIF and QVGA are the main resolutions, only 15 or 25 fps is supported and the bitrate needs to be quite low (256 kbps).
You can also use .3GP and .3G2 containers for MPEG-4 codecs, as well as using .M4V container. Just keep in mind that iTunes uses H264 MAIN profile in their .m4v videos so they will NOT play in N96.
WMV can also have the extension .ASX or .ASF usually for streaming links. I had had some problems if the wmv or asf file contains more than 1 video or audio stream. The end result being that it doesn't play or plays partially.
MPEG-4 Part 10 also includes the "normal" mpeg-4 (non AVC) and several Levels are supported. Baseline profile Levels 1, 1b, 1.1, 1.2, 1.3, 2. So it's an alternative as well.
Thumbnails and other issues to keep in mind
You can still create you personalized thumbnails to be displayed in video center following my previous tips. HERE
The file attribute “hidden” should be turned on for the thumbnail. The best way to do this is to set the hidden attribute when you create the images on a Windows PC (right mouse click on file in File Explorer -> Properties ->Hidden). Or use YBrowser to achieve the same effect.
Also, the Photos application also shows videos stored in your device. So you can choose whether to use Photos or Video Center.
On this occasion I want to share with all my list of recommended settings for encoding video to be used in N96.
While I've done a lot of testing, please note that this is just my recommendation, and this was tested with a firmware that may be different to what you have in your hands so things may have changed.
I'll keep using the N96 and if I find any significant changes I'll post an updated version. I've also done efforts to cross check my findings with what's available from official sources so I feel pretty confident that these settings are accurate.
As always, if you have comments or questions, feel free to add them here. I'll do my best to review, post and answer any questions you may have. Even if the answer is "I don't know" ;)
Ok on to the settings:
For playback in N96 screen
Codec: MPEG-4 Part 10 AVC/H264 Baseline Profile
Container: .mp4
Resolution: QVGA 320x240
Aspect Ratio: 4:3 (1.3333)
Framerate: As per source but limit is 29.97
Bitrate: 600 kbps (but can go as high as 1 Mbps but there's little gain in quality)
Audio: mpeg4aac, 96 kbps @ 44.1 KHz sample rate (can use 48 KHz if source is 48 KHz)
For use with TV-out
Codec: MPEG-4 Part 10 AVC/H264 Baseline Profile
Container: .mp4
Resolution: VGA 640x480
Aspect Ratio: 4:3 (1.3333)
Bitrate: 1 Mbps
Framerate: As per source up to 29.97.
Audio: mpeg4aac, 96 kbps @ 44.1 KHz sample rate (can use 48 KHz if source is 48 KHz)
Alternatively you can use MPEG-4 Part 2 SP/H263 Simple profile as the codec and use bitrates of 3 Mbps, this creates much bigger files but it's an alternative to H264/AVC.
Keep in mind that TV-out will change your video somewhat as the video will need to streched/cropped to PAL or NTSC and also the frame rate will change to comply with TV standards.
For WMV videos
Resolution: CIF (352x288) or QVGA (320x240). I haven't tested but QCIF (176x144) may also work.
Codec: WMV9 VC-1 SP/ MP.
Bitrate/Framerate: Depends on the profile you use. VC1 Simple profile: low level (QCIF 15fps), medium level (QVGA 24fps / CIF 15fps 384 kbps, VC1 Main profile, low level (CIF 30fps 2Mbps)
Audio part will be WMA (WMA2 part of WMV9) Use 32 kbps. and sample rate as per source material, you can of course go higher depending on the video bitrate. But for most cases I rather sacrifice audio quality than video since there's not a lot of headroom.
For Flash Lite Videos
If you are already converting your videos to FLV you can also use them on the N96 but these videos don't show up in the Video Manager or Photos applications so you need to access them through the File Manager.
Here are the specs:
Codec: Sorenson Spark or h263 or VP6
Resolution: QVGA 320x240
Bitrate: 192 kbps (for video part)
Framerate: 25 fps for h263 15 fps for Sorenson or VP6
Audio: MP3 (Mpeg1 Layer 3) variable bitrate
Combined bitrate should be around 350 kbps (in my tests if you start going to around 500kbps then the playback becomes choppy).
Other Codecs and Containers
There are other possible codecs to use, like Realvideo (Rm or Rmvb) but after doing some testing I don't recommend using Real as the performance is much restricted. I guess the main reason for still keeping real (keeping it real), ;) is mainly for video streaming. So CIF and QVGA are the main resolutions, only 15 or 25 fps is supported and the bitrate needs to be quite low (256 kbps).
You can also use .3GP and .3G2 containers for MPEG-4 codecs, as well as using .M4V container. Just keep in mind that iTunes uses H264 MAIN profile in their .m4v videos so they will NOT play in N96.
WMV can also have the extension .ASX or .ASF usually for streaming links. I had had some problems if the wmv or asf file contains more than 1 video or audio stream. The end result being that it doesn't play or plays partially.
MPEG-4 Part 10 also includes the "normal" mpeg-4 (non AVC) and several Levels are supported. Baseline profile Levels 1, 1b, 1.1, 1.2, 1.3, 2. So it's an alternative as well.
Thumbnails and other issues to keep in mind
You can still create you personalized thumbnails to be displayed in video center following my previous tips. HERE
The file attribute “hidden” should be turned on for the thumbnail. The best way to do this is to set the hidden attribute when you create the images on a Windows PC (right mouse click on file in File Explorer -> Properties ->Hidden). Or use YBrowser to achieve the same effect.
- TIP: Some things to keep in mind is that when you load a lot of video clips, video center may not show them right away, you may need to leave it open for a few minutes before the library is refreshed. While this is happening your videos may not play correctly as the N96 is furiously searching for all those videos and creating thumbnails.
- TIP: If you just inserted a Memory Card with lots of videos, they may not appear right away in the Video Center, you have to let the program find the videos. It's very important that you either a) DO NOT remove the memory card while Video Center is searching for videos or b) Use the"Remove F: Memory card" option from the power button. Failure to do so may cause corruption to the Memory card
Also, the Photos application also shows videos stored in your device. So you can choose whether to use Photos or Video Center.
- TIP: Remember to save your videos in the VIDEOS or MY VIDEOS folders in the Mass Memory (E:) or the memory card (F:)
Tuesday, September 2, 2008
Quick N96 Video Center TIP
One thing I just learned today.
In the New Video Center for N96 you can search for Videos just like you search in other places. By typing any letter or word that may be in the video title.
See below:

This makes navigation through long lists of videos much easier.
Cheers!
In the New Video Center for N96 you can search for Videos just like you search in other places. By typing any letter or word that may be in the video title.
See below:

This makes navigation through long lists of videos much easier.
Cheers!
Tuesday, August 5, 2008
New N96 Video Center!
Hello all,
Not many readers are coming here now a days, I guess I haven't been promoting the blog as much. There are so many blogs out there also talking about video for your phones that it's easy for 1 blog to get lost in the pile.
I'll keep posting on the Nokia Discussion Forum and sending people over here when I've already made a post that may help them.
Anyways I wanted to post a quicky about the N96. It seems to me that new videos and reviews are popping out almost every other day. Also the Nokia.com pages seem to have gotten an update. Could it be that this monster video phone is almost ready to hit the shelves?
As some of you know I've been allowed to play with a pre-released version of the N96. And I wanted to share some things about the device.
I LIKE IT!
Coming from an N95 8GB and also having used the N91 8GB for a while, this is the next natural step. It has a whopping 16 GB on board plus I got an 8GB memory card to play with it. So it feels like it will never run out of space...
The build quality seems to be very good, but I'm not a big fan of the battery cover. But once in place it fits well.
The kickstand is a great addition as it makes watching videos a lot easier, although the angle that the screen makes is maybe not the best it beats having to hold the device all the time.
Here are some screenshots of the main menu:


As you can see this is very familiar specially when compared to the N78 , menus. Nothing really worth metioning.
I'll focus on what this blog's about which is the video section. This is where we find the major changes compared to all previous products.
When you open Video Center this is what you get:

On the first section you get the last played video if you hit the center select you get the option to play from beginning or continue where you last stopped the video.
TIP: It's important to note that you continue where you STOP a video and not where you PAUSE a video, so when using Video Center press STOP to save the point where you left the video.
The next section shows how many videos there are in your phone that can be played by Video Center. Note that FLV videos cannot be played from Video Center so they don't show here. A new addition is that it shows how many UN-PLAYED videos there are (i.e. New videos).
TIP: When you transfer many videos to the phone you have to open Video Center and wait for a while (depending on how many videos you loaded) for the videos to appear, if you load 5-10 videos at one go they show up in a few seconds. So keep this in mind if you transfer 20 or more videos at one go.
The next section is Video Feeds. This is the same as previous Video Center. You can subscribe to video feeds. And also add video feeds.

After you add a feed you need to connect to the internet to download the items that can be played from the feed. Keep in mind that some feeds will Stream content while others are Download, meaning that you need to wait for the whole video to download before it plays.


The last section of the main Video Center menu is Video Directory. This launches a Nokia site where you can subscribe to additional video feeds and get more video content.
Now going back to the My Videos view. If you open it you will be greeted by a new way of navigating through your video collection:

All videos: Self Explanatory
Download: Downloaded videos
TV Recordings: Recordings made from the DVB-h Mobile TV application only.
Personal Videos: Videos you took with the phone
Other: All the rest.
Once you select one of the above you will see a list of videos like this:
 Notice the red asterisk on videos that have not been played. From here you can press play or use the center rocker to start playback.
TIP: I'm happy to report that thumbnails can either be automatically generated or user loaded like in the old Video Center.
 Interesting to note that some of the preloaded videos that this device had where on both QVGA resolution and VGA resolution like in the above picture (Snake for TV out).
 I tried to take a snapshot of videos playing but they didn't come out. But anyways, the video quality is the same as the N95 8GB. Some new things though. The light sensor in the N96 makes the screen change brightness to adjust the contiditions, and for the most part does a good job.
You can use the front media keys or the other media keys (if you expose them) to control playback. Auto rotation works well with Video Center, allowing you to move from portrait to landscape by just turning the device.
The codec support is very similar to the N95 8GB with the following additions:
WMV9 at QVGA resolution which allows you to play WMV movies or streaming links if they are QVGA or less.
H264 (MPEG4 AVC) at VGA resolution. So now you can have movies for TV out that look almost like a DVD. YEAH!
One more mention, is that uPNP is still going strong.
 I used the home media application with a PC using Simple Center and everything seems to work fine. I can play videos music and images both ways. I may do a post specifically showing this withmy PC and also with the Playstation3 it's just that I'm camera shy. :)
In the next post I'll talk about the new Gallery Application, aka Photos.
Until then, keep on rockin!
Tuesday, July 22, 2008
I'm starting to get too Lazy... Check this out!
It had been a while since I posted.
It's also been a while since I visited Symbian-Freak site, since I usually just go to the boards there.
In the Home Page there's a link to a thread about video encoding for phones. It's quite good if you want information on how to use MediaCoder
So head down there and check it out!
This is the link
http://www.symbian-freak.com/forum/viewtopic.php?t=6977
Until next time.
Cheers everyone!
Monday, June 16, 2008
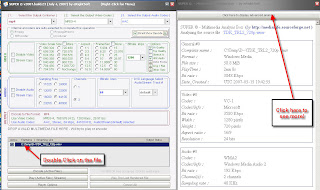
Video file properties
Very quickly.
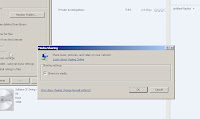
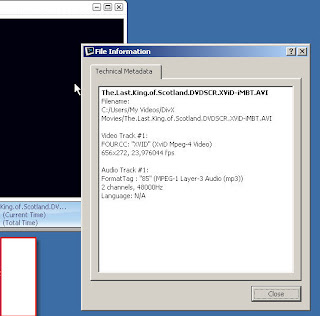
In a previous post I showed how you can read the Video Properties in different tools. HERE
Someone sent me a link to the source tool that provides the information for SUPER. The tool is called MediaInfo and can be found HERE.
I just started using it, it's very simple and powerful and should help when trying to figure out why a certain video doesn't play in X or Y device.
Cheers!
Monday, May 12, 2008
Home Media, uPNP and DNLA
Hello again,
In this entry I would like to share some of my experiences with uPNP and using Nseries and Playstation 3 together with a PC.
First a bit about uPNP (Universal Plug and Play) you can learn about it in wikipedia or other places, but basically is a protocol to connect various devices and share content over a wide range of connectivity options.
The uPNP and DNLA both have certifications and lists of certified products, I'm still confused a bit about what does it mean to be DNLA or uPNP certified. But at least these sites are resources to find out if the products you have are certified.
Now let's go back to more practical things. If you are not yet using uPNP, then there are several options to start your set-up. One of the simplest ones would be to have a PC with Windows Media Player 11 installed, and a WLAN router. NOTE: It may be possible to also do this using ad-hoc wlan connection but I've had limited success doing this.
In WMP11 you can enable uPNP sharing by going to Tools --> Options

Click to enlarge
Then in the Library tab select the Configure Sharing button and you get this:
Click to enlarge
In this entry I would like to share some of my experiences with uPNP and using Nseries and Playstation 3 together with a PC.
First a bit about uPNP (Universal Plug and Play) you can learn about it in wikipedia or other places, but basically is a protocol to connect various devices and share content over a wide range of connectivity options.
The uPNP and DNLA both have certifications and lists of certified products, I'm still confused a bit about what does it mean to be DNLA or uPNP certified. But at least these sites are resources to find out if the products you have are certified.
Now let's go back to more practical things. If you are not yet using uPNP, then there are several options to start your set-up. One of the simplest ones would be to have a PC with Windows Media Player 11 installed, and a WLAN router. NOTE: It may be possible to also do this using ad-hoc wlan connection but I've had limited success doing this.
In WMP11 you can enable uPNP sharing by going to Tools --> Options

Click to enlarge

Click to enlarge
Select to share then OK.
From this point on, even if WMP is not running the computer is "listening" for uPNP devices to share content with. After you turn on Sharing in your Nseries device a pop-up window will come in the PC to inform you that there is a new device you need to click on it to allow the device to connect to WMP11.
In the phone you will go to Menu --> Tools --> Connectivity --> Home media
From here a wizard will start to enable you to set what gets shared and which connection method to use, etc. Also when it connects to WMP11 you have to answer YES in the phone to allow it to connect to WMP11 as well.
Select Browse Home and you should find the computer and be able to browse, play, and transfer media files that are in the WMP11 library to the phone. It's very straight forwards. See screenshots. There are many limitations though. On the plus side, the computer just needs to be ON, WMP11 doesn't even need to be running and you don't need to LOG-into windows for this to work. On the bad side, only content that WMP11 can "see" meaning that it's in the WMP11 library can be shared. So MP4 and AVI files are not there by default, there are ways to make WMP11 "see" this files and add them to the library but that's outside the scope now. Also you can't control playback on the PC from the phone.
The next option is to install the Home media PC application called "simple center". You can install from here.
It's also fairly straight forwards. Simple center takes you to the next level. It allows you not only to share things from the PC to Phone but also the other way around and allows you to control playback of Music, Images or Videos directly from the Phone, so that it acts as a remote control for your media. If you buy the full version of Simple Center you can also access the files across the internet and not just on your local LAN.
I was going to post some screenshots but I've been mighty busy lately so I'm posting this AS IS. Leave a comment if you want some specific help about this post.
Until next time, keep on watching!...
Wednesday, May 7, 2008
ImTOO 3GP encoder and H264
Since my early posts I've been advising people that I'm a user of
ImToo encoding solutions. I bought these encoders because they were cheap and got good feedback from other users of these solutions. Also because I wanted something to make the conversion from DVD to portable format easier.

I ended up buying the bundle of ImToo 3GP Suite that includes both the DVD to 3GP Encoder and the 3GP Encoder (Above).

First I recommend you download the software and try it before buying. Usually ImToo tools allow you to encode short videos or encode up to 5 minutes. This is great as it will allow you to try out the different format and settings until you feel comfortable that this is what you want.
Since I started using ImToo there's been a flood of encoders in the web. Mostly due to the popularity of the iPod video and other PMP devices. Back in 2002 when I started creating videos for mobile phones there were not a lot of options and the Nokia Multimedia Converter was one of the only ones available to do 3GP and h263. Real also had RealProducer which is a good software if you want to use realvideo format. But I've stuck with them since it works for me and if ImToo doesn't work with something then I can always use SUPER.

Click to enlarge
 Click to enlarge
 Click to enlarge
ImToo encoding solutions. I bought these encoders because they were cheap and got good feedback from other users of these solutions. Also because I wanted something to make the conversion from DVD to portable format easier.
I ended up buying the bundle of ImToo 3GP Suite that includes both the DVD to 3GP Encoder and the 3GP Encoder (Above).
First I recommend you download the software and try it before buying. Usually ImToo tools allow you to encode short videos or encode up to 5 minutes. This is great as it will allow you to try out the different format and settings until you feel comfortable that this is what you want.
Since I started using ImToo there's been a flood of encoders in the web. Mostly due to the popularity of the iPod video and other PMP devices. Back in 2002 when I started creating videos for mobile phones there were not a lot of options and the Nokia Multimedia Converter was one of the only ones available to do 3GP and h263. Real also had RealProducer which is a good software if you want to use realvideo format. But I've stuck with them since it works for me and if ImToo doesn't work with something then I can always use SUPER.

Click to enlarge
 Click to enlarge
 Click to enlarge
Some things to keep in mind...
- The bitrate, frame rate and resolution you set will only work if it's a combination that's supported by your phone. For more information see here.
- The ZOOM option in Imtoo encoders work in conjunction with the Aspect setting in the Video section of the settings. I tend to use the ZOOM option and not play around with the Aspect ratio setting. But you may want to try to use either.
- Further, zoom only works reliably if the source video doesn't have black bars as part of the picture frame. If they do then the black bars will be part of the video. See here.
- 3GP, 3GPP2, MP4 and MPEG-4 AVC all work in Nseries devices but you got to have the right settings.
- If using h264 codec don't forget to expand the Expert section of the settings and set the coder to 0 (zero).
- DVDs are all created differently. The same settings that work for 1 dvd will cause audio synch problems with another dvd or a jumpy picture.
- This is also due to the fact that some DVDs are encoded at 23.987 fps others at 29.97 fps others at 24 fps
- Some dvds have interlaced frames others have progressive frames.
- Some dvds have AC3 audio some have ProLogic2 or other audio formats. Some have only PCM audio.
- Remember to select the right Language track and right subtitle if you want to have those enabled
- TIP: Try first to encode one chapter of the dvd and try it out, if something is wrong right click on the chapter and play around with the settings. Email Imtoo support to get some more tips on how to solve specific problems they usually respond within a day or two.
- If it doesn't work sometimes it's not the fault of the encoder or the device or you, but a combination of different factors. No matter how hard you try sometimes some dvds are just difficult to find the correct settings to encode.
- Other DVD encoders may be more robust/smarter than Imtoo. So again shop around, try different solutions and if you find something that totally blows aways Imtoo please share in the comments so I can also try it! :)
- Have fun!, that's what it's all about.
Monday, May 5, 2008
Take control of your videos
Hello and welcome back!

Cluster of controls N95 8GB
 Detailed names of Controls
In this post I would like to share with you some useful shortcuts and other controls you can use with Nseries devices to control playback of the RealPlayer.
I'll look at the Flash Player in a separate post. I haven't been very successful with it so I need to spend more time with it before I can make any intelligent comments :)
Ok, now on to the shortcuts and other tips.
- If your phone has dedicated player controls
- Press Play to play and pause playback
- Press Skip forward or Rewind to jump to the end or begining of the current video
- Press Stop to stop. TIP: Use this to re-start at this point when in Video Center
- Press AND hold Skip Forward or Rewind to search within a video. TIP: Keep an eye on the timer, as you keep pressed longer the timer will accelerate helping you search within long video files.
- Use the volume control to increase or decrease the volume. In many cases you can also use the rocker or joystick up or down (depending on the orientation) to act as volume control or as Skip and Rewind keys.
- Press DOWN on the directional pad or joystick to decrease the Volume
- Press LEFT on the directional pad or joystick to Rewind or jump to previous Video
- Press RIGHT on the directional pad or joystick to Skip or jump to next Video
- Press CENTER select to PLAY/PAUSE
In Some models you can switch between FULL SCREEN (landscape mode) and Partial Screen (portrait), by pressing the 2 or 5 key. In some models this will NOT change the orientation of the video but just remove the menu bar.
Remember that pressing and holding the REW, FFW keys lets you search within a video.
In Video Center for N95 8GB you can skip to next video or previous video by using the REW, FFW keys.

Cluster of controls N95 8GB
 Detailed names of Controls
If you have comments or questions feel free to drop me a line or two in the comments.
Tuesday, April 29, 2008
What's next?
N96 video specs seem to continue to come out.
This is great news, as I expect the Video Optimized N96 to be a powerhouse for video playback.
So far what has been released is that it will support everything the N95 8GB supports (including FLV flash videos), but then it will also add:
Hopefully more information will become available in the near future.
Leave a comment if there's a topic you would like me to cover in more detail.
Until next time:
Keep on watching...
PS: Recently I started watching Heroes tv series and I'm totally hooked, if you like mutants and comic books, check it out!
This is great news, as I expect the Video Optimized N96 to be a powerhouse for video playback.
So far what has been released is that it will support everything the N95 8GB supports (including FLV flash videos), but then it will also add:
- WMV 9 Windows Media Video 9
- H264 @ VGA resolution and 30 fps
- MPEG-4 VGA at 30 fps
Hopefully more information will become available in the near future.
Leave a comment if there's a topic you would like me to cover in more detail.
Until next time:
Keep on watching...
PS: Recently I started watching Heroes tv series and I'm totally hooked, if you like mutants and comic books, check it out!
Thursday, March 20, 2008
Easter Eggs
Just in time, have a good Easter (if you celebrate it).
Also, I would like to talk about a topic that matches this time of year very good.
Easter Eggs in DVDs.
Easter Eggs are some "hidden" things in the DVD discs. Some funny outtakes, additional scenes, interviews, or other things.
In cases where these features are video you can also encode them for use in your Nseries.
Some things you may need:
If this information is not enough to allow you to do this. Leave a comment and I'll update the post with more details.
Until next time,
May the force be with you!
Also, I would like to talk about a topic that matches this time of year very good.
Easter Eggs in DVDs.
Easter Eggs are some "hidden" things in the DVD discs. Some funny outtakes, additional scenes, interviews, or other things.
In cases where these features are video you can also encode them for use in your Nseries.
Some things you may need:
- Have a DVD that has these hidden contents (there are some websites that keep track of these easter eggs or hidden features)
- Identify the Track number and Chapter number where these video clips are hidden
- Have a DVD software that allows you to read the Track and Chapter numbers like Imtoo DVD to 3GP.
- Encode using working settings
If this information is not enough to allow you to do this. Leave a comment and I'll update the post with more details.
Until next time,
May the force be with you!
Monday, March 17, 2008
How to check your video properties?
Many of us have problems converting videos. It's not straightforward. And when you ask for my help I always ask about your video. You should always be able to read what type of video you are dealing with before you start questioning why it doesn't work.
In many cases once you read your video properties it will become quite obvious why it doesn't play. As long as you know that compatible resolutions are:
sub-QCIF
QCIF
CIF
QVGA
VGA
So take these tips as an important step into figuring out what you need to convert in order to be able to use the video in your phone.
These are some useful ways to see the video file information in different players or applications.
Quicktime
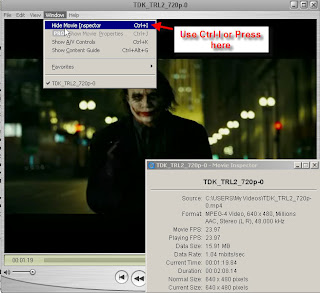
RealPlayer
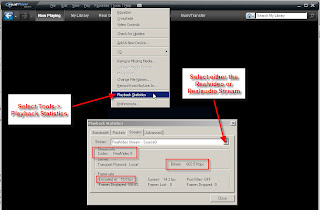
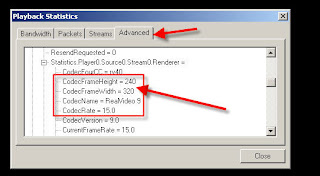
ImToo 3GP encoder
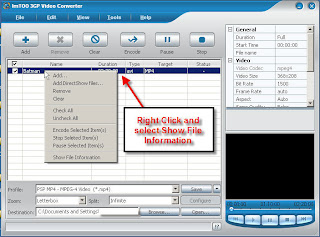
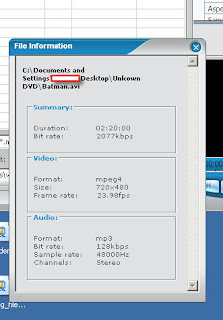
SUPER
DIVX player
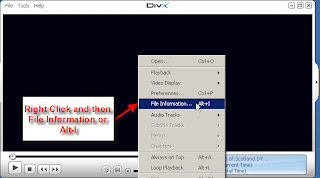
Windows Media Player 11
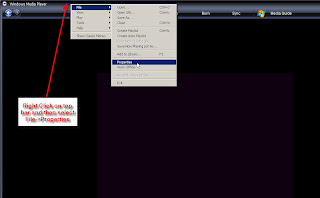
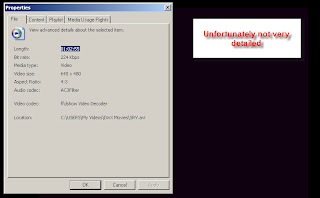
Let me know if this post was useful. Since I use these tools all the time...
Until next time. Keep on watching...
In many cases once you read your video properties it will become quite obvious why it doesn't play. As long as you know that compatible resolutions are:
sub-QCIF
QCIF
CIF
QVGA
VGA
So take these tips as an important step into figuring out what you need to convert in order to be able to use the video in your phone.
These are some useful ways to see the video file information in different players or applications.
Quicktime

RealPlayer


ImToo 3GP encoder


SUPER

DIVX player


Windows Media Player 11


Let me know if this post was useful. Since I use these tools all the time...
Until next time. Keep on watching...
Thursday, March 13, 2008
Widescreen or Fullscreen and why?
Hello again.
This time I want to touch on the question of the aspect ratio of your videos and put forth some pros and cons.
These comments, as many others I've made and will continue to make here, are my opinion. And opinions are like belly buttons, everyone has one! (ok someone may not have either).
So why do we have this widescreen and why is it so difficult to make a screen fit another screen.
Well let's start from the beginning...
Umm, where to start. Ok let's start with the good old television. Television systems (since the B&W) days have been an aspect ratio of 4:3. Then we had 3 different color systems, PAL, SECAM and NTSC. Each system with a different number of lines (resolution) and frame rate. In particular there's the difference between PAL and NTSC where one is interlaced and the other has full frames.
Anyways, I don't want to get into more details than what we need. Suffice to say that the programming created for each system (tv. shows, made for tv movies, etc.) can be of different resolutions, framerates, and be interlaced or not depending on what they were shown originally.
Then we had the tape era, and again the basic differences were following the TV standards. In the DVD era things started changing. As the underlying video source could be shown in multiple tv standards by Software manipulation. This is both good and bad.
Some years ago HDTV started gaining some traction. And then we started getting some TV content made in "widescreen" format to fit these new TV sets. For the most part these new programs are displayed in a 16:9 aspect ratio but the resolution and framerate depends on the HDTV standard used. Then we also have progressive and interlaced but this is mostly handled by the TV decoder.
But let's leave the TV originated content and switch to the movies. Movies in the really old days were shot in a square aspect ratio. Then they started moving to some other aspect ratios until the cinemascope aspect ratio came about. As things progessed we started having some other aspect ratios for Panavision and also for IMAX theaters. Along with the aspect ratios different technologies in the film have changed, including how many frames are shown, the size of the film frame and recently the digital projection method that does away with film altogether.
What this means for the Widescreen discussion is that there are different sources of Aspect Ratios depending on when the movie was shot, and what type of projection method it uses.
Now I'm going to ignore all the different things you can find on the internet, since these aspect ratios you find have nothing to do with the original content from the TV, DVD, VHS, Laserdisc, UMD, DAT, BRD, HD-DVD, etc.
If you are a film buff, then you may agree that the widescreen original format is the way to go. But what about the aspect ratio?, well even if you use all the pixels the aspect ratio may be wrong due to non-square pixel usage.
So what can you do?, I don't have a good answer.
If you don't want to see the full picture and want to see a cropped version of the original content then this is what you can do.
I'll use the NTSC DVD from a recent movie as example. PAL DVDs are usually 720x576 5:4.
See more here
If you open a DVD stream it's size is usually 720x480 (720x576 PAL) which is an aspect ratio of 1.5 (1.25 PAL) but the actual video is aspect ratio of 2.35 so what they do is they put the black bars already in the DVD video to fill the extra pixels to make 480.
So when you try to convert it using some Pan&Scan or Zoom it calculates these black bars as being part of the picture frame, so it converts from 1.5 (1.25 PAL) to 1.3333 aspect ratio (320x240), but in reality it should convert from 2.35 to 1.3333. That is to say the converter thinks the movie is 720x480 and converts it to 320x240 but the actual video part is only 720x306, but since 306 is not divisible by 16 then they pad the video with black pixels.
This is further complicated because some movies use also other aspect ratios like 1.778 (16x9) or 1.85 (cinemascope) but then they put those also into 720x480 NTSC DVD (720x576 PAL).
So what can you do. First is figure out what the actual video screen aspect is. Most DVDs will have this information in the back of the box.
Then get a calculator and figure out how many pixels are there in the vertical and how many pixels are there in the video feed. So if its a 2.35 anamorphic movie and the video size is 720x480 the actual video size is only 720x306 so there are 87 extra black pixels in the top and bottom. (There's more in the PAL DVD)
So in order to get full screen you would have to first copy the movie into WMV or AVI (but you must have DIVX codec installed in your machine to use AVI or FFMPEG). And don't change the resolution leave it in auto.
Now you will have a DIRECTSHOW file that has the black bars. Now you will use SUPER encoder (www.erightsoft.com) to re-encode this video. Encode into WMV or AVI if you want to further encode it or directly into MPEG-4 if you want. Use the DIRECT SHOW BUTTON and then you will have to use the CROP/PAD and you will crop the picture.
156 pixels on each side and 86 on the top and 88 on the bottom. This will create a video that's 408x306 (or 1.333333). Now use Super again and encode into the right size. (320x240).
Complicated, no?
Well in the end I think this is a waste of time. I just use the medium zoom option in ImToo DVD to 3GP Converter and this is a good compromise. I don't loose a big part of the frame and I can see it better in the small screen.
Wednesday, March 12, 2008
Will this video play on my Nxx?
Sometimes the question is: why doesn't this video play?
Well to learn more see my old post HERE
_________________
I know some of you will not so here are some more generic tips.
These are the generic baselines for most Nseries devices. Some models support more, but as a general guide.
Basic compatibility
Newer Nseries:
This is why many of the H264 videos don't play on Nseries devices even if they are in a supported resolution and bitrate.
As of today N95, N95 8GB, N93 and others support H264 at QVGA resolution. At VGA it will stutter or not play regardless of the bitrate or frame rate.
A note on quality, different codecs and framerate.
In general, the quality of a video is dictated by the resolution, bitrate and the frame rate. But these parameters also control the size of the video.
Plus if you use MPEG-4 and AVC (H264) the resolution has to be divisible by 16, otherwise you waste a lot of space (resulting file is needlessly large). So if you use a resolution of 640x480 this is better than 640x396 since 396 is not a factor of 16. 320x160 is better than say 320x150. 320x144 is OK though.
OK, this is basic good information but I want better quality than the general compatible quality!
In this case it starts to get more complicated as videos you encode may ONLY work on your device and may not work on other devices. For the best settings IMHO see my post about using SUPER.
What if I want to play AVI files or XVID?
This is also a common question. First thing is you need to get a player for your device that can play this codec.
I recommend you get DIVX mobile Player (see links at the bottom of my blog)
If you want a better experience and don't mind spending some money get CorePlayer or Smartmovie.
Anyway. What ever the player you get there will be some limitations due to the smaller CPU in the phone than your PC. So as a rule of thumb in my experience videos that are smaller than VGA tend to play almost correctly. Videos that are VGA or greater will drop many frames. Again QVGA, CIF videos play correctly almost 100% of the time. Also VCD resolution plays ok (480x480) for the most part. But once you get higher than this you start running into problems.
TIP: Using TV out is great because TV-out resolution is VGA instead of the internal display 's QVGA. So you see more pixels with TV-out.
TIP: When you use TV-out the CPU has more to do, so a video that plays marginally good in the phone may not play or play worse when using TV-out.
I welcome your comments. Tell your buddies about the blog, email the posts. Let's get more people into enjoying Video in their Nseries devices!
Well to learn more see my old post HERE
_________________
I know some of you will not so here are some more generic tips.
These are the generic baselines for most Nseries devices. Some models support more, but as a general guide.
Basic compatibility
- RealVideo 8,9 and 10 (note that there is no support for Realvideo 7! or 11). Video size of QCIF, QVGA , CIF. Bitrate of 128 Kbps.
- h263 video in 3GP or 3G2 or MP4 container at 128 kbps (narrow band audio AMR or AAC)
- MPEG-4 in a 3GP, 3G2, MP4 or M4V container at 256 kbps (aac audio mono or stereo)
Newer Nseries:
- Support VGA MPEG-4
- (N95, N81, N82, etc) support H264 in an MP4 or M4V container. BUT, and this is key, only the Baseline profile of H264 is supported.
This is why many of the H264 videos don't play on Nseries devices even if they are in a supported resolution and bitrate.
As of today N95, N95 8GB, N93 and others support H264 at QVGA resolution. At VGA it will stutter or not play regardless of the bitrate or frame rate.
A note on quality, different codecs and framerate.
In general, the quality of a video is dictated by the resolution, bitrate and the frame rate. But these parameters also control the size of the video.
Plus if you use MPEG-4 and AVC (H264) the resolution has to be divisible by 16, otherwise you waste a lot of space (resulting file is needlessly large). So if you use a resolution of 640x480 this is better than 640x396 since 396 is not a factor of 16. 320x160 is better than say 320x150. 320x144 is OK though.
OK, this is basic good information but I want better quality than the general compatible quality!
In this case it starts to get more complicated as videos you encode may ONLY work on your device and may not work on other devices. For the best settings IMHO see my post about using SUPER.
What if I want to play AVI files or XVID?
This is also a common question. First thing is you need to get a player for your device that can play this codec.
I recommend you get DIVX mobile Player (see links at the bottom of my blog)
If you want a better experience and don't mind spending some money get CorePlayer or Smartmovie.
Anyway. What ever the player you get there will be some limitations due to the smaller CPU in the phone than your PC. So as a rule of thumb in my experience videos that are smaller than VGA tend to play almost correctly. Videos that are VGA or greater will drop many frames. Again QVGA, CIF videos play correctly almost 100% of the time. Also VCD resolution plays ok (480x480) for the most part. But once you get higher than this you start running into problems.
TIP: Using TV out is great because TV-out resolution is VGA instead of the internal display 's QVGA. So you see more pixels with TV-out.
TIP: When you use TV-out the CPU has more to do, so a video that plays marginally good in the phone may not play or play worse when using TV-out.
I welcome your comments. Tell your buddies about the blog, email the posts. Let's get more people into enjoying Video in their Nseries devices!
How to COPY files between PC and Phone (Just for you bettina...)
Ok here are some pictures on how you can Copy a file in the PC from one folder to another.
First open the Windows Explorer to the folder you want the files. In this case the Output folder from SUPER. See picture:
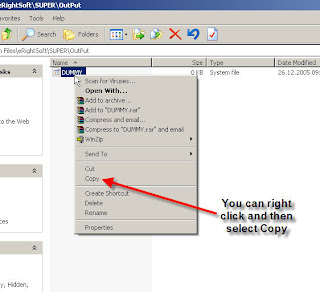
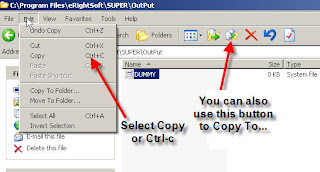 Alternatively you can select the file then right-click on it like this:
 Now the file is the windows "clipboard" a temporary storage location. Now open the folder in you phone, in this example is E:\My Videos but it could also be I:\My Videos.
 Select Paste.
You can do this with many files at a time, folders, or one by one.
Other tips. If you want to select multiple files, select one file (click on it) then hold down the "Shift" key on your keyboard and select another file. All the files in between will be selected.
Another method is to click on one file then hold down the CTRL (Ctrl) key and select another, now both files will be selected. You can use this method to control which files you select. If you want to remove a file from the selection just click on it again (while still holding down the Ctrl key).
I hope this helps!.
First open the Windows Explorer to the folder you want the files. In this case the Output folder from SUPER. See picture:
 Alternatively you can select the file then right-click on it like this:
 Now the file is the windows "clipboard" a temporary storage location. Now open the folder in you phone, in this example is E:\My Videos but it could also be I:\My Videos.
 Select Paste.
You can do this with many files at a time, folders, or one by one.
Other tips. If you want to select multiple files, select one file (click on it) then hold down the "Shift" key on your keyboard and select another file. All the files in between will be selected.
Another method is to click on one file then hold down the CTRL (Ctrl) key and select another, now both files will be selected. You can use this method to control which files you select. If you want to remove a file from the selection just click on it again (while still holding down the Ctrl key).
I hope this helps!.
Tuesday, March 11, 2008
How to become a better Video editor...
Ok the title is a little deceptive.
I assume most people don't want to learn, couldn't care less .... about the technical details and nuances that come with digital video editing, video encoding and video conversion or transcoding. And I agree 1000% :)
But to be honest the only way to make sense out of all these things is to study a bit and learn about what you're up against. At the minimum you should have this links somewhere so that if you see an acronym or term you don't understand you can go and read about it. READ, such an underrated tool...
So without further ado, here are some good links for information:
So what do Nokia S60 devices support?; well see this:
Nokia Video Feature table (press "Audio & Video Features tables")
Unfortunately not all the information on that Table is accurate. E.G. In there it shows the N91 supporting 320x240 h264 AVC which is incorrect, it only supports QCIF h264.
If you don't know what QCIF means go HERE.
A good guide about "anamorphic video" and why should you care. No, honestly this is a must if you are encoding videos from a DVD and want to get rid of those pesky black bars. AnamorphicGuide
If you still feel like you need to get to the bottom of the resolution issues. READ this it's a really good page.
Video Containers (these are those extensions we see but are different that codecs)
Different Video Codecs (Must read this)
DVD video Highly recommended to read.
MPEG-4
MPEG-4 Video stuff
MPEG-4 Part 2 Divx, Xvid and Quicktime
MPEG-4 levels
Video Codec (what's a video codec really?)
Mpeg industry forum
This is not an extensive list and by no means do I encourage people to become experts. But if you are of a technical inquisitive nature, then go and learn about it, and then come back and teach me a thing or two ;)
Cheers!
Thursday, March 6, 2008
Using SUPER encoder with Nseries
Hello fellow Nokia users.
I want to spend some time with this post, I began working on it some time ago. The main idea is to provide a "fail safe" mode and setting to encode both VGA and QVGA resolution movies that will play in your Nseries device.
Before you begin check out my list of installed software. My setup
If you just want to know some settings that work for most Nseries devices then click on the pictures below. Just make SUPER settings look like this:
 h264 settings
 mpeg4 settings
One thing that's important before you begin is to get codecs into your computer. The most important one that I recommend is DIVX codec since this one will allow you to use AVI files (xvid or divx) as DIRECT SHOW files. HERE
Direct Show is important as this enables the coder software to manipulate the stream (I don't think we need the technical details). Basically allows you to do advanced editing functions like rotating, cropping, flipping, mirror, etc.
You also need a player. Quicktime is quick and easy (pun intended). So go get it HERE
I know you could use the Nokia provided Multimedia player but I find Quicktime much more convenient and better.
Another good addition would be FFDSHOW mpeg4 codec pack but this is not necessary strictly speaking and it's a bit more complicated so I'll leave this one alone unless you feel comfortable messing around with advanced settings.
Ok once you have installed the codecs, now it's time to get the SUPER encoder. This is where some people have their first problem, they can't find the download link or it doesn't work. This is the direct link:

Click on the picture
If you have problems the help provided is pretty self explanatory. Use IE, turn on Java scripts, clear the cache and don't connect through a proxy. When ready hit the link "Start Downloading Super".
You should be able to save the file SUPERSetup.exe. Run the file and install SUPER. I believe it connects to the internet while installing, I've done my own checking and nothing malicious, but if you feel unsure about it, just don't install it.
With me so far?, ok, now an icon will be created in your desktop. Now you can start using SUPER. When you start the program it will connect to the internet and check that you have the latest version.
Once it starts you are at the main screen which can be rather intimidating at first. But once you know what the things are then it's actually not that hard. Once you set it once you pretty much don't need to touch it again as it will save the last settings you used to encode.

Ok now let me go over the main controls that are at the top numbered 1,2 and 3.
The first one is the Container. This refers to the extension or MIME type that the file will be output to. Like .MP4, .3G2, .3GP, .AVI.

For Nseries devices you can select mp4 or 3gp. Other settings MAY work but I haven't experimented with all of them. So feel free to try on your own time and share your results.
Now let's move to the next setting. The Codec.
 The codec list shown will depend on the Container you selected in the previous screen. So for MP4 that would be the list of codecs. For Nseries devices you can use MPEG-4, H264 or H263.
Well now, it's time to select the audio codec. In this case it's simple. Just leave the AAC as the codec.
The next thing I want to touch on is DIRECT SHOW button.

When you will use an input file (the video you want to transcode), that's supported by Windows, then it's a Directshow file. Basically if Windows Media Player can play the video then you can select Directshow. There are some limitations though and it may not work 100% but that's the theory.
Why is this importat?, well as I mentioned before if you have Directshow then you can do more advance editing on the file like these options (press the Button):

So, you can join files to create looped version (multiple copies end-end) slow down playback, speed it up. flip, rotate, change colors, change to B&W, include fade in or fade out, add the clip info or a watermark.
Just remember that you should do just 1 effect per transcode. This is important, if you select multiple things then it will fail. Also Remember to press the RST (reset) buttons to CLEAR your settings after you are done, otherwise the next video you transcode will use this same settings.
If the video you are converting is NOT Directshow. Like a Quicktime movie or an FLV, then don't select DirectShow!
So now we have selected the Container, Codec, Audio and DirectShow settings (if applicable). It's time to select the video output details. Click on picture for bigger picture.

It's pretty self explanatory. I just want to point your attention to the H264 button. In some posts I've warned people about the different H264 types and why some H264 files don't play. Well hit the button.
 And a new window will open (you can move the window location). Then here it's very important to select BaseLine. Otherwise the video will not play.
Now let's continue with the settings. The next area you see is the AUDIO section of SUPER:

As you can see you can select here the sample rate, number of channels, bitrate and Language track (for DVD video files but I've never used this feature). I recommend not going overboard with the Sampling frequency and bitrate. From my experience 64 or 96 kbps produce decent quality audio for most applications and sampling at 48 or 44.1 Khz is ok.
Now that we've looked at the main settings. Let's encode a file.
The first thing you need to do is right click on the SUPER window to bring up the menu.
Then from here you might want to change the output destination folder so that you manage where the encoded files end up (by default they end up in c:\program files\erightsoft\super\output).
Now select Add Multimedia Files and select the files you want to convert.
Once you select a file it should look something like this:
 The files will be listed there with a checkbox next to it. The file has to be checked to be converted. Please check that it's checked.
From here you can also play the file using the Play button, or Encode.

Then sit and wait.
Encoding times vary greatly depending on the settings, the input file type, your CPU and memory and what you're doing. But on average expect the transcoding to take 1.5-2 times what the file is. So for a 2 hour movie expect 3-4 hours. conversion time.
Ok, congratulations!, you've successfully transcoded a video. Now it's time to put it into your phone.
Easiest way:
TIP: Remember to always stop your USB devices before unplugging them from your PC to avoid data corruption. Press this button:
This is not a be all, end all guide to using SUPER but I hope that with this information you are able to use it for video convertion into Nseries devices. For more detailed instructions and features go to the Erightsoft pages HERE
I welcome your comments.
Until next time,
Cheers!
I want to spend some time with this post, I began working on it some time ago. The main idea is to provide a "fail safe" mode and setting to encode both VGA and QVGA resolution movies that will play in your Nseries device.
Before you begin check out my list of installed software. My setup
If you just want to know some settings that work for most Nseries devices then click on the pictures below. Just make SUPER settings look like this:
 h264 settings
 mpeg4 settings
If you want the more detailed walkthrough keep reading.
Direct Show is important as this enables the coder software to manipulate the stream (I don't think we need the technical details). Basically allows you to do advanced editing functions like rotating, cropping, flipping, mirror, etc.
You also need a player. Quicktime is quick and easy (pun intended). So go get it HERE
I know you could use the Nokia provided Multimedia player but I find Quicktime much more convenient and better.
Another good addition would be FFDSHOW mpeg4 codec pack but this is not necessary strictly speaking and it's a bit more complicated so I'll leave this one alone unless you feel comfortable messing around with advanced settings.
Ok once you have installed the codecs, now it's time to get the SUPER encoder. This is where some people have their first problem, they can't find the download link or it doesn't work. This is the direct link:

Click on the picture
You should be able to save the file SUPERSetup.exe. Run the file and install SUPER. I believe it connects to the internet while installing, I've done my own checking and nothing malicious, but if you feel unsure about it, just don't install it.
With me so far?, ok, now an icon will be created in your desktop.
 Now you can start using SUPER. When you start the program it will connect to the internet and check that you have the latest version.
Once it starts you are at the main screen which can be rather intimidating at first. But once you know what the things are then it's actually not that hard. Once you set it once you pretty much don't need to touch it again as it will save the last settings you used to encode.

Ok now let me go over the main controls that are at the top numbered 1,2 and 3.
The first one is the Container. This refers to the extension or MIME type that the file will be output to. Like .MP4, .3G2, .3GP, .AVI.

For Nseries devices you can select mp4 or 3gp. Other settings MAY work but I haven't experimented with all of them. So feel free to try on your own time and share your results.
Now let's move to the next setting. The Codec.
 The codec list shown will depend on the Container you selected in the previous screen. So for MP4 that would be the list of codecs. For Nseries devices you can use MPEG-4, H264 or H263.
Well now, it's time to select the audio codec. In this case it's simple. Just leave the AAC as the codec.
The next thing I want to touch on is DIRECT SHOW button.

When you will use an input file (the video you want to transcode), that's supported by Windows, then it's a Directshow file. Basically if Windows Media Player can play the video then you can select Directshow. There are some limitations though and it may not work 100% but that's the theory.
Why is this importat?, well as I mentioned before if you have Directshow then you can do more advance editing on the file like these options (press the Button):

So, you can join files to create looped version (multiple copies end-end) slow down playback, speed it up. flip, rotate, change colors, change to B&W, include fade in or fade out, add the clip info or a watermark.
Just remember that you should do just 1 effect per transcode. This is important, if you select multiple things then it will fail. Also Remember to press the RST (reset) buttons to CLEAR your settings after you are done, otherwise the next video you transcode will use this same settings.
If the video you are converting is NOT Directshow. Like a Quicktime movie or an FLV, then don't select DirectShow!
So now we have selected the Container, Codec, Audio and DirectShow settings (if applicable). It's time to select the video output details. Click on picture for bigger picture.

It's pretty self explanatory. I just want to point your attention to the H264 button. In some posts I've warned people about the different H264 types and why some H264 files don't play. Well hit the button.
 And a new window will open (you can move the window location). Then here it's very important to select BaseLine. Otherwise the video will not play.
Now let's continue with the settings. The next area you see is the AUDIO section of SUPER:

As you can see you can select here the sample rate, number of channels, bitrate and Language track (for DVD video files but I've never used this feature). I recommend not going overboard with the Sampling frequency and bitrate. From my experience 64 or 96 kbps produce decent quality audio for most applications and sampling at 48 or 44.1 Khz is ok.
Now that we've looked at the main settings. Let's encode a file.
The first thing you need to do is right click on the SUPER window to bring up the menu.
Then from here you might want to change the output destination folder so that you manage where the encoded files end up (by default they end up in c:\program files\erightsoft\super\output).
Now select Add Multimedia Files and select the files you want to convert.
Once you select a file it should look something like this:
 The files will be listed there with a checkbox next to it. The file has to be checked to be converted. Please check that it's checked.
From here you can also play the file using the Play button, or Encode.

Then sit and wait.
Encoding times vary greatly depending on the settings, the input file type, your CPU and memory and what you're doing. But on average expect the transcoding to take 1.5-2 times what the file is. So for a 2 hour movie expect 3-4 hours. conversion time.
Ok, congratulations!, you've successfully transcoded a video. Now it's time to put it into your phone.
Easiest way:
- Connect the USB cable to phone
- Select File Transfer or Data Tranfer or Mass Storage as USB mode
- Once Windows completes adding the device open the File Explorer in your PC and locate the new Drive that represents your phone

- Copy the video file to this drive under My Videos.
- If you don't know how to copy a file in Windows then maybe video conversion is too advanced for you.

TIP: Remember to always stop your USB devices before unplugging them from your PC to avoid data corruption. Press this button:

This is not a be all, end all guide to using SUPER but I hope that with this information you are able to use it for video convertion into Nseries devices. For more detailed instructions and features go to the Erightsoft pages HERE
I welcome your comments.
Until next time,
Cheers!
Subscribe to:
Posts (Atom)

FREE TRIAL


 DVD to MP4 Suite

 DVD Ripper